Aquaponics System Design: Planning Your Perfect Setup
Aquaponics system design determines whether you'll harvest fresh vegetables in three months or troubleshoot problems for a year. Your perfect setup balances three fixed constraints: the space you have available, the time you can commit weekly, and the budget you're willing to invest. Most beginners skip this planning phase and end up with systems too large for their commitment level or too small to produce meaningful harvests.
Table of Contents
- Understanding Your Aquaponics Goals and Constraints
- Defining Your Primary Purpose
- Assessing Your Available Resources
- Setting Realistic Expectations
- Evaluating and Preparing Your Location
- Space Requirements by System Type
- Indoor vs. Outdoor Location Factors
- Structural and Accessibility Considerations
- Choosing Your System Type and Configuration
- Media Bed Systems: The Beginner-Friendly Choice
- NFT and DWC Systems: Higher Yield Options
- Hybrid System Approaches
- Vertical vs. Horizontal Layouts
- Sizing Your System Components Correctly
- The Fish Tank to Grow Bed Ratio
- Pump and Flow Rate Specifications
- Filtration and Aeration Requirements
- Planning Your Budget: DIY vs. Kit Systems
- DIY System Cost Breakdown
- Commercial Kit Advantages and Costs
- Ongoing Operating Costs
- Hidden Costs to Consider
- Creating Your Implementation Timeline
- Pre-Build Planning Phase
- Construction and Assembly
- Cycling and Establishment
- First Planting and Harvest Cycles
The design process starts with honest self-assessment, not equipment catalogs. I've seen countless growers buy expensive components before clarifying whether they want daily salad greens or a teaching tool for grandchildren. These different goals require completely different system configurations.
Understanding Your Aquaponics Goals and Constraints
Your system's success depends on matching its design to your actual situation, not an idealized version of your available resources. Well, this means getting specific about what you want to produce and what you can realistically maintain.
Defining Your Primary Purpose
Food production goals vary dramatically between growers. If you're supplementing grocery bills, you need consistent yields of high-value crops like lettuce, herbs, and tomatoes, this requires 20-40 square feet of growing space minimum. Hobby gardeners often prioritize variety and experimentation over volume, making smaller 10-15 square foot systems perfectly adequate.
Educational systems for teaching children or community groups need visibility and accessibility more than maximum production. A countertop system or transparent tank setup delivers better learning value than an efficient but visually boring configuration tucked in a basement.
Social engagement through aquaponics clubs or online communities often drives design toward photogenic setups or unusual species combinations. These goals are completely valid but require different component choices than pure production systems.
Assessing Your Available Resources
Budget reality shapes every design decision. Small DIY systems start around $200-500 using repurposed containers and basic pumps (according to Auburn University's cost analysis). Mid-range setups with proper tanks, quality media, and reliable components run $800-2,000. Professional kits or custom builds exceed $3,000 but include warranties and technical support.
Time commitment separates successful growers from those with expensive lawn ornaments. New systems demand daily monitoring for 4-6 weeks during cycling, then transition to weekly maintenance once established (according to University of Maryland Extension). If you travel frequently or work unpredictable hours, automated monitoring becomes essential rather than optional.
Physical capabilities matter more than most planning guides acknowledge. Systems requiring frequent bending, lifting water-filled containers, or climbing to access overhead components create barriers for growers with mobility limitations. Waist-height grow beds and front-access designs eliminate these problems.
Available space includes both footprint and vertical clearance. A 275-gallon IBC tote system needs 8x4 feet of floor space plus 7 feet of height. Indoor locations require electrical outlets within 6 feet and water access for regular top-offs.
Setting Realistic Expectations
A 50-gallon system with 8 square feet of growing space produces roughly 15-20 heads of lettuce monthly once established. Doubling the system size more than doubles output because larger water volumes stabilize more easily, reducing crop losses from parameter swings.
The learning curve spans 6-12 months before most growers achieve consistent harvests. Your first cycle will likely include fish losses, algae blooms, and nutrient deficiencies, these aren't failures, they're the education process. Starting with hardy goldfish instead of expensive tilapia reduces the emotional and financial cost of this learning period.
Evaluating and Preparing Your Location
Location determines 60% of your system's performance before you add a single component. Temperature swings, inadequate light, or difficult access create ongoing problems that no amount of equipment can fully solve.
System Size and Production Capacity Comparison
| System Size | Fish Tank Volume | Growing Space | Monthly Lettuce Output | Initial Budget | Weekly Maintenance Time |
|---|---|---|---|---|---|
| Small (Beginner) | 40-50 gallons | 8-15 sq ft | 15-20 heads | $200-500 | 3-5 hours |
| Medium (Intermediate) | 100 gallons | 20-50 sq ft | 40-60 heads | $800-2,000 | 5-8 hours |
| Large (Advanced) | 275+ gallons | 50+ sq ft | 100+ heads | $3,000+ | 8-12 hours |
Space Requirements by System Type
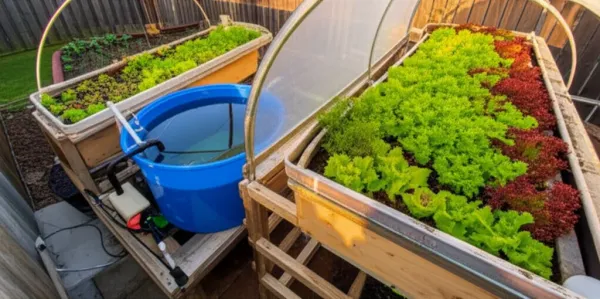
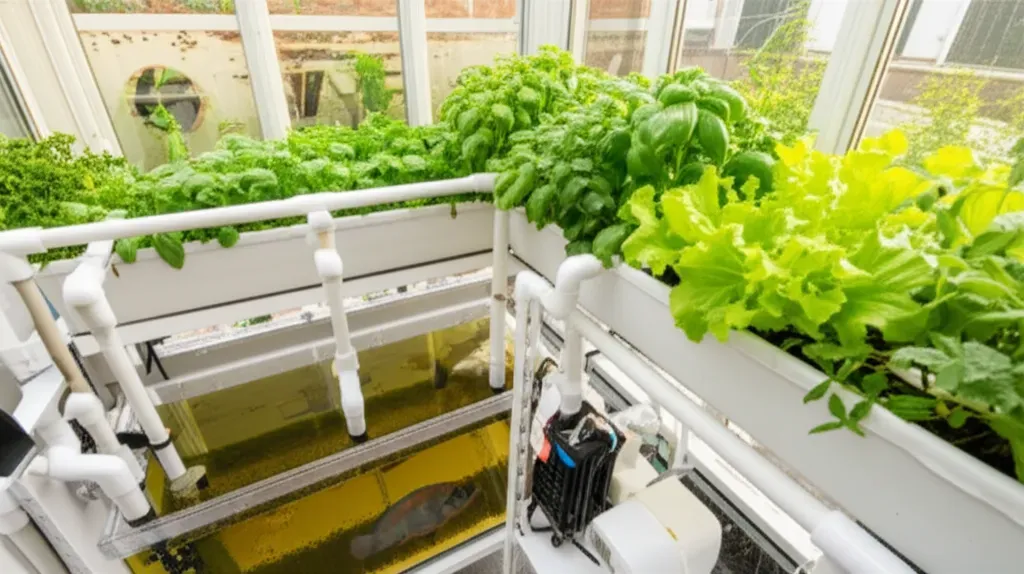
Small systems occupy 10-20 square feet including access space for feeding, testing, and harvesting. A typical configuration pairs a 40-gallon fish tank with two 2x4-foot grow beds. Medium systems spanning 20-50 square feet usually involve 100-gallon fish capacity with multiple grow beds or a combination of media beds and raft tanks.
Large home systems exceeding 50 square feet often repurpose IBC totes or stock tanks. One 275-gallon tote cut in half provides both fish tank and grow bed, creating a compact footprint despite substantial volume. Add 18-24 inches on all sides for maintenance access, you'll need to reach the back corners eventually.
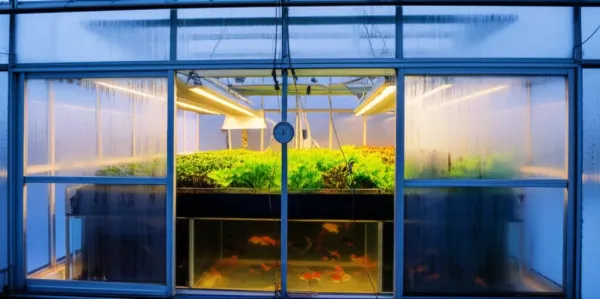
Indoor vs. Outdoor Location Factors
Basements offer temperature stability and year-round operation but require artificial lighting. LED grow lights for a 20-square-foot system draw 200-400 watts continuously, adding $25-50 monthly to electricity costs. Humidity management becomes critical in finished basements where mold poses structural risks.
Garages and outbuildings provide space and utility access but often lack climate control. Water temperatures below 60°F slow fish metabolism and plant growth dramatically. Insulated greenhouses solve this but represent significant additional investment.
Outdoor systems in temperate climates operate seasonally unless you're committed to heating water through winter. Full sun exposure drives algae growth in fish tanks, requiring shade cloth or opaque tank covers. Predators including raccoons, herons, and neighborhood cats will find your fish tank, so secure covers aren't optional.
Electrical access within 6 feet is non-negotiable for pumps and aerators. GFCI-protected outlets prevent dangerous shocks around water. Proximity to a water source matters less than you'd think, most systems need only 5-10 gallons weekly for evaporation replacement.
Structural and Accessibility Considerations
Water weighs 8.3 pounds per gallon. A modest 100-gallon system with media beds totals 1,200+ pounds when full. Most residential floors handle this load, but second-story installations or older homes may require structural assessment. Concrete garage floors and ground-level outdoor placements eliminate these concerns.
Working height dramatically affects long-term sustainability of your aquaponics practice. Grow beds positioned 30-36 inches high allow harvesting and planting without bending. Fish tanks at 24-30 inches provide easy viewing and feeding access. Avoid designs requiring step stools or floor-level work if you have knee or back limitations.
Drainage planning prevents water damage during maintenance or component failures. Indoor systems need either floor drains or containment trays under all tanks. Outdoor systems should slope away from building foundations with overflow routed to appropriate drainage areas.
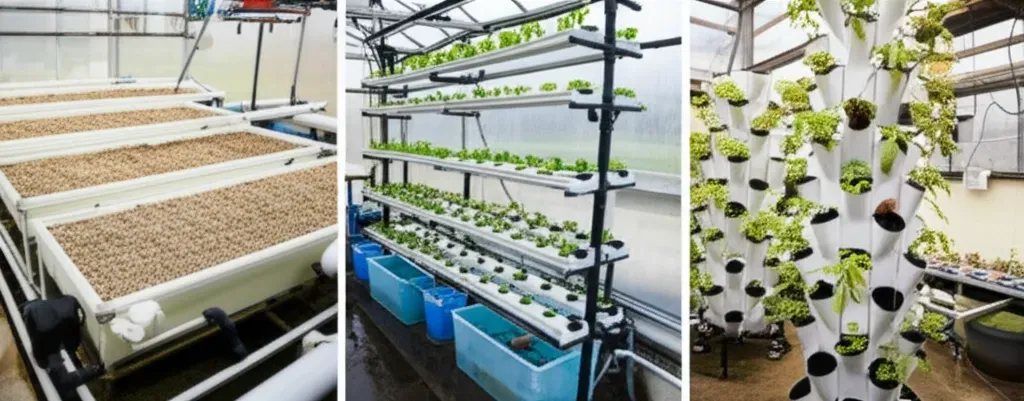
Choosing Your System Type and Configuration
System type selection matches your growing goals with your tolerance for monitoring and adjustment. The three main categories each excel at different production objectives and require different management intensity.
System Type Characteristics and Suitability
| System Type | Best For | Space Efficiency | Maintenance Level | Typical Cost Range | Learning Curve |
|---|---|---|---|---|---|
| Media Bed | Beginners, diverse crops | Moderate | Low-Moderate | $200-1,500 | Easiest |
| NFT (Nutrient Film Technique) | Leafy greens, high yield | High | Moderate-High | $800-2,500 | Moderate |
| DWC (Deep Water Culture) | Lettuce, herbs, fast growth | High | Moderate | $600-2,000 | Moderate |
| Hybrid System | Mixed production, flexibility | High | Moderate-High | $1,500-3,500 | Advanced |
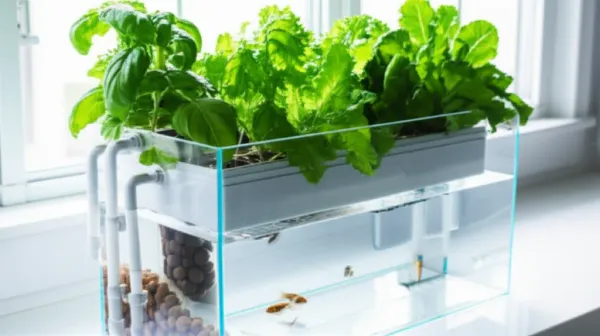
Media Bed Systems: The Beginner-Friendly Choice
Media bed systems are recommended for beginners because they're relatively simple to construct and operate, and they're more forgiving of mistakes (according to University of Hawaii research). Expanded clay pebbles or gravel host beneficial bacteria while supporting plant roots, combining biological filtration with growing space in one component.
These systems excel at producing fruiting crops like tomatoes, peppers, and cucumbers that need root support. The media provides thermal mass that buffers temperature swings, and the flood-and-drain cycle naturally aerates roots. If you're over 50 and want a system that doesn't demand daily attention, media beds deliver the most stability.
Typical sizing uses 12-inch-deep beds with 1:1 to 1:2 fish tank to grow bed volume ratio (according to NCAT's sustainable agriculture program). A 50-gallon fish tank supports 50-100 gallons of grow bed space depending on fish species and stocking density.
NFT and DWC Systems: Higher Yield Options
Deep water culture (DWC) or raft systems are typically used in commercial aquaponics operations because they can produce larger quantities of leafy greens more efficiently (according to University of Hawaii). Plants float in rafts with roots suspended in nutrient-rich water, maximizing growing density for lettuce, basil, and other quick-growing crops.
NFT systems flow a thin film of water through channels, supporting even higher plant density. Both types demand more attention to dissolved oxygen levels and water chemistry than media beds. If parameters drift, you'll see plant stress within hours rather than days.
These configurations suit growers who want maximum lettuce production from limited space and don't mind daily monitoring. The trade-off for higher yields is reduced system stability and less flexibility in crop selection.
Hybrid System Approaches
Combining media beds with raft tanks or NFT channels provides both stability and production diversity. A common design uses media beds for biological filtration and fruiting crops, with the filtered water then flowing through raft tanks for leafy greens before returning to fish.
Starting with a simple media bed system and adding DWC or NFT components later allows you to expand production without rebuilding infrastructure. Design your initial plumbing with future expansion points, extra pump capacity and additional valve connections cost little upfront but enable growth without system overhaul.
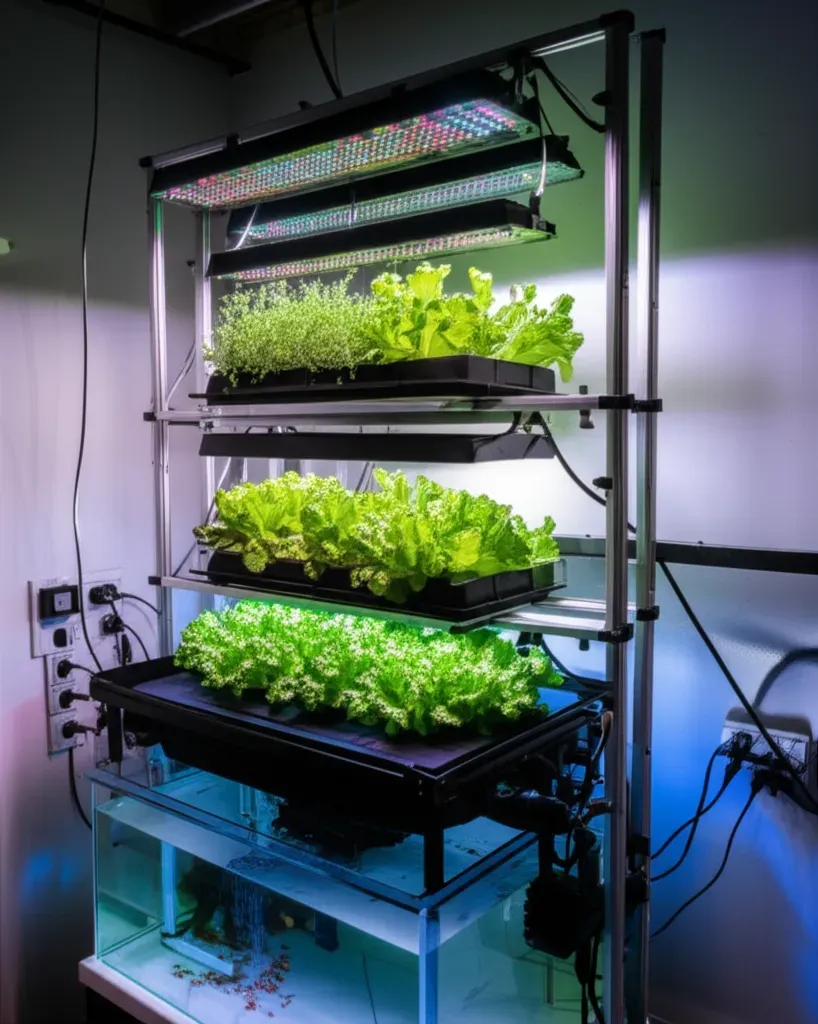
Vertical vs. Horizontal Layouts
Vertical towers and stacked growing channels multiply production in limited footprints. A 4x4-foot vertical system can provide 30+ square feet of growing surface. The downside is that upper levels require reaching or step stools for maintenance, creating accessibility barriers.
Horizontal configurations at consistent working height sacrifice space efficiency for ergonomic access. If you're managing arthritis or balance concerns, horizontal layouts prevent the strain and fall risk of vertical designs. This is one area where your physical capabilities should override space optimization.
Sizing Your System Components Correctly
Component sizing determines whether your system maintains stable parameters or lurches between crisis and recovery. Undersized filtration or inadequate flow rates create chronic problems that frustrate even experienced growers.
The Fish Tank to Grow Bed Ratio
A general rule of thumb for media-based systems is to maintain approximately a 1:1 ratio between the fish tank volume and the grow bed volume (according to NCAT). This provides sufficient biological filtration surface area to process fish waste. Many successful systems run 1:2 ratios with heavier fish stocking, but this requires careful monitoring.
Practical examples: a 55-gallon fish tank supports 55-110 gallons of grow bed volume. A 100-gallon stock tank pairs with 100-200 gallons of growing space. IBC tote systems often split one 275-gallon container into 140 gallons of fish tank and 135 gallons of grow bed, creating a balanced ratio in compact footprint.
DWC systems require additional mechanical filtration since raft tanks don't provide the bacterial surface area of media beds. Plan for separate biofilter volume equal to 20-30% of your fish tank capacity.
Pump and Flow Rate Specifications
Water flow rate should be sufficient to cycle the entire system volume at least once per hour (according to University of Hawaii). A 150-gallon system needs a pump rated for 150+ gallons per hour (GPH) at your specific head height. Head height is the vertical distance the pump must lift water from source to destination.
Most aquaponics pumps operate at 3-6 feet of head height. Check manufacturer specifications, a pump rated 400 GPH at zero head height might deliver only 200 GPH at 5 feet. Size pumps 20-30% above your calculated minimum to account for this reduction and future expansion.
Energy efficiency matters for systems running 24/7. A quality pump drawing 45 watts costs roughly $4 monthly to operate, while cheap alternatives at 80 watts double that expense over years of operation.
Filtration and Aeration Requirements
Mechanical filtration removes solid waste before it clogs grow beds or raft tanks. Simple swirl filters or settling tanks handle this in small systems. Size mechanical filters to process your full flow rate, a 300 GPH pump needs a filter rated for at least 300 GPH throughput.
Biofilter surface area hosts the beneficial bacteria that convert ammonia to nitrates. Media beds provide this naturally. Systems using DWC or NFT need dedicated biofilters with surface area roughly equal to 1 square foot per pound of fish at full stocking density.
Dissolved oxygen keeps fish healthy and bacteria active. Air pumps with diffuser stones should provide 1-2 liters per minute of airflow per 50 gallons of fish tank volume. This seems excessive but becomes critical during summer heat when warm water holds less oxygen.
Planning Your Budget: DIY vs. Kit Systems
Budget planning separates realistic projects from abandoned half-built systems. Honest cost assessment includes not just initial components but ongoing expenses and the value of your time.
DIY System Cost Breakdown
Small hobby-scale aquaponics systems can be built for approximately $500 to $1,500 using do-it-yourself methods and repurposed materials (according to Auburn University). A basic 50-gallon setup includes: fish tank ($50-100), grow bed container ($30-60), pump ($40-80), air pump and stones ($25-40), media ($50-100), plumbing and fittings ($40-70), and initial fish and seeds ($30-50).
Medium systems in the 100-200 gallon range run $1,000-2,500 depending on material choices. IBC tote conversions offer excellent value, a used 275-gallon tote costs $50-100 versus $200-400 for purpose-built tanks of similar volume. The trade-off is that totes require cutting and modification skills.
Testing equipment adds $100-200 for essential meters: pH meter ($30-50), ammonia test kit ($15-25), nitrite test kit ($15-25), and nitrate test kit ($15-25). Thermometers are cheap but critical. Digital meters require periodic calibration solution ($15-30 annually).
Commercial Kit Advantages and Costs
Complete aquaponics kits eliminate design guesswork and component compatibility issues. Entry-level kits for $400-800 include everything needed for 10-15 square feet of growing space. Mid-range kits at $1,200-2,500 provide 20-40 square feet with better pumps and more durable materials.
Premium systems exceeding $3,000 include warranties, customer support, and sometimes initial cycling assistance. For growers who value time over money or lack DIY confidence, this support justifies the cost premium. You're paying for someone else's troubleshooting experience.
Ongoing Operating Costs
Monthly electricity for pumps, aerators, and lighting (if indoor) typically runs $15-40 for small systems, $40-80 for medium setups. Fish food costs $10-30 monthly depending on fish species and stocking density. Water replacement for evaporation adds minimal cost but requires planning in drought-prone areas.
Annual expenses include replacement air stones ($10-20), periodic media cleaning or replacement ($30-60 every 2-3 years), and test kit refills ($40-60). Budget for occasional pump or heater replacement, these components have 3-5 year typical lifespans under continuous operation.
Hidden Costs to Consider
Backup systems prevent total loss during power outages or equipment failures. A battery-powered air pump ($25-40) keeps fish alive during short outages. Spare pumps ($40-80) allow immediate replacement rather than emergency shopping while fish stress in stagnant water.
Climate control costs surprise many indoor growers. Heating water to 75°F in a cold basement can add $30-60 monthly in winter. Cooling is harder and more expensive, if your location regularly exceeds 85°F, budget for shade cloth, fans, or evaporative cooling.
Learning costs include fish losses during cycling and crop failures during parameter optimization. Starting with $20 of goldfish instead of $100 of tilapia reduces this tuition expense. Consider your first six months an educational investment, not pure production.
Creating Your Implementation Timeline
Realistic timelines prevent burnout and allow proper system establishment. Rushing through cycling or skipping preparation steps creates problems that take months to resolve.
Pre-Build Planning Phase
Spend 2-4 weeks researching and planning before buying components. Sketch your layout with measurements, list every required component, and calculate costs. This planning phase saves money by preventing duplicate purchases and design changes mid-build.
Construction and Assembly
DIY builds typically require 2-4 full days of work for small systems, 4-8 days for medium setups. Spread this over 2-3 weekends to avoid fatigue mistakes. Kit assembly takes 4-8 hours for simple designs, 12-20 hours for complex configurations.
Test all plumbing and electrical components before adding media or water. A leak discovered during cycling means draining the system and starting over. Run pumps for 24 hours to verify flow rates and check for drips at every connection.
Cycling and Establishment
The cycling process to establish beneficial bacteria colonies typically takes 4-6 weeks before the system can support fish at full capacity (according to NCAT). This timeline is non-negotiable, adding fish too early results in ammonia poisoning and losses. Test water daily during cycling, tracking ammonia, nitrite, and nitrate levels.
Start with hardy cycling fish like goldfish at 25-50% of final stocking density. Their waste feeds bacteria growth while minimizing risk. Once ammonia and nitrite consistently read zero and nitrates are present, you can gradually increase fish numbers over 2-3 weeks.
First Planting and Harvest Cycles
Plant fast-growing crops like lettuce and herbs 2-3 weeks into cycling. These tolerate imperfect water chemistry and provide early success. Fruiting crops like tomatoes should wait until cycling completes and the system shows 4+ weeks of stable parameters.
First harvests occur 4-6 weeks after planting for leafy greens, 10-16 weeks for fruiting crops. Plan successive plantings every 2 weeks to create continuous harvest rather than feast-or-famine production. This staggered approach also helps you learn optimal plant spacing and timing.
I remember planting my first tomatoes just three weeks into cycling—eager and impatient. The plants yellowed within days, stressed by ammonia spikes my lettuce had tolerated without complaint. That expensive lesson taught me the value of patience: now I always start a new system with basil and loose-leaf lettuce, saving my heirloom tomatoes for week six when the biofilter has proven itself with consistent zero-ammonia readings.
Your aquaponics system design determines whether you'll enjoy years of productive harvests or struggle with a maintenance burden that exceeds the value it provides. Start with honest assessment of your goals, constraints, and capabilities. Choose system types and sizes that match your actual situation rather than aspirational ideals. Look, the perfect system isn't the biggest or most complex, it's the one you'll actually maintain and enjoy operating.
Begin by selecting your location and measuring available space precisely. Calculate your budget including ongoing costs, not just initial components. Decide whether DIY construction or a commercial kit better suits your skills and available time. Then create a realistic timeline that includes proper cycling and gradual establishment.
The growers who succeed long-term are those who plan thoroughly before building, size components correctly for their production goals, and set expectations that match the system's actual capacity. Your design choices made today will either support or undermine your aquaponics practice for years to come.
Related Articles
- Complete Guide to Aquaponics Systems: How They Work & Getting Started
- Types of Aquaponics Systems: Design Methods & Best Practices
- 6 Main Types of Aquaponics Systems Compared
- DIY Aquaponics Systems: Complete Build Guide for Beginners
- Best Fish for Aquaponics Systems: Complete Species Guide
- How Does an Aquaponics System Work? The Complete Cycle Explained
Frequently Asked Questions
How much space do I actually need to start aquaponics?
Space requirements depend on your goals: food production needs 20-40 square feet minimum, hobby gardeners can start with 10-15 square feet, and educational setups prioritize visibility over size. A basic 50-gallon system requires about 8x4 feet of floor space plus 7 feet of vertical clearance for an IBC tote configuration.
What's the difference between DIY and commercial kit systems in terms of cost?
Small DIY systems start at $200-500 using repurposed containers, mid-range setups cost $800-2,000 with quality components, and professional kits exceed $3,000 but include warranties and support. Choose DIY for budget-conscious beginners and kits if you value convenience and technical guidance.
How much time commitment does an aquaponics system require?
New systems demand daily monitoring for 4-6 weeks during the cycling phase, then transition to weekly maintenance once established. If you travel frequently or have unpredictable schedules, plan for automated monitoring systems to maintain water quality and fish health.
What realistic harvest can I expect from a beginner system?
A 50-gallon system with 8 square feet of growing space produces roughly 15-20 heads of lettuce monthly once established. Doubling system size more than doubles output because larger water volumes stabilize more easily and reduce crop losses from parameter fluctuations.
How long does it take to get consistent harvests from an aquaponics system?
Most growers achieve consistent harvests within 6-12 months of operation. Expect your first cycle to include fish losses, algae blooms, and nutrient deficiencies as you learn the system, but these challenges are normal parts of the learning process.
What system type should a beginner choose?
Media bed systems are the most beginner-friendly option because they're forgiving and easier to troubleshoot. NFT and DWC systems offer higher yields but require more precise monitoring, making them better suited for experienced growers.
What hidden costs should I budget for beyond the initial setup?
Beyond initial equipment, budget for ongoing operating costs including electricity for pumps and aeration, fish food, replacement media, water treatments, and emergency repairs. The article mentions hidden costs exist but recommends reviewing the 'Ongoing Operating Costs' section for a detailed breakdown.
Can I build an aquaponics system if I have mobility limitations?
Yes—design your system with waist-height grow beds and front-access components to eliminate frequent bending, lifting, or climbing. Physical accessibility should be a key design consideration from the planning stage, not an afterthought.